One of the scariest moments for an emergency contact is often not seen. It's the moment they glance at the clock, realize you said you'd be back by now, and feel the first small pull of worry. What happens in the hour after that moment depends almost entirely on what you set up before you left.
If they know where you went, when you were due, and who to call, the worry turns into action fast. If they don't, the worry just sits there and grows while they dig through old texts trying to remember the name of the trailhead.
The trip portfolio is the thing we built for that moment. It collects your whole trip into one place and hands the people at home a single link that holds all of it. This post walks through how it works, from your side and from theirs. It's a longer one, because we'd rather you understand the whole thing than skim a feature list.
The clock starts when someone notices
Search and rescue (SAR) is busier than most people realize, and more often than not, it runs on volunteers. In Colorado alone, teams respond to about 3,600 missions a year spread across roughly 50 teams and 2,800 volunteers. Those volunteers each spend around $1,500 of their own money a year on gear and gas, and the state estimates the combined cost of missions and donated time at about $21 million annually. Nationally, the picture is the same shape. One review of National Park Service records counted more than 65,000 search and rescue incidents over a fifteen-year span, roughly eleven a day, and concluded that without responders on scene, about one in five people who needed help would not have survived.
Here's the part that matters for trip planning. Most people who get lost are found quickly. One veteran SAR manager pegs it at 85 percent found within twelve hours and 97 percent within a day, and the national data agrees that the large majority are located inside a 24-hour window. The longer it takes, the worse the odds get.
But that clock doesn't start when something goes wrong. It starts when someone at home notices you're overdue and makes the call. Everything before that call is invisible to rescuers. If the person at home has a clear picture (where you were headed, when you were due, what you're driving, who has jurisdiction), that call goes out early and lands with real and truly helpful information. If they're piecing it together from a half-remembered conversation and a device link that quietly stopped updating, the call goes out late, vague, or not at all.
A search can only move as fast as the information behind the first phone call.
Making sure someone has a clear outline of your itinerary is a sure-fire way to shrink the search if something were to happen. A rescue is planned backwards from you: your destination, your likely route, the places you'd potentially be. The more of that a team knows, the less ground they have to cover. The Canadian SAR education program AdventureSmart puts numbers on it. When a team knows your route, they only have to search about 3 square kilometers within a kilometer of it. Take that route away and the radius they're forced to cover grows tenfold, pushing the search area past 300 square kilometers. Same person, same mountains, a hundred times more terrain to comb, decided entirely by whether anyone knew the plan. It's why the guidance is the same everywhere you look: the National Park Service tells visitors to leave their itinerary with a trusted contact who isn't going, and to have that person call authorities and share it if they don't return on time.
We wrote about this in The Trip Starts at Home: a plan only you know about helps you survive, but a plan someone else knows helps everyone. The trip portfolio is how you put that plan somewhere the right person can actually find it: not scattered across four apps, but in one link that knows what to do.
A plan only helps if the person at home can find it without you.
Your side: building a portfolio, start to finish
Everything below lives behind a free account at trekfreely.org. You build a portfolio once before a trip, in a guided set of steps you can stop and resume any time. Nothing is graded, most of it is optional, and the things you enter once (your vehicle, your gear, your medical details) are saved to your account so the next trip starts most of the way done.
Start from your trips list and create a new trip. That drops you into the builder.
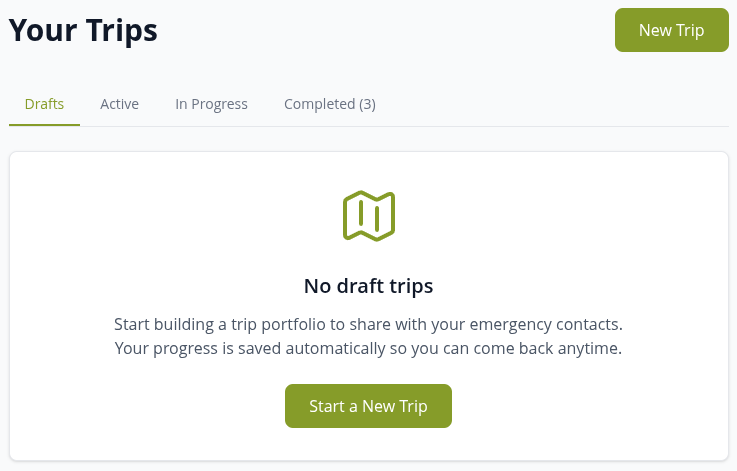 Everything starts from your trips list. One trip, built once, reusable next time.
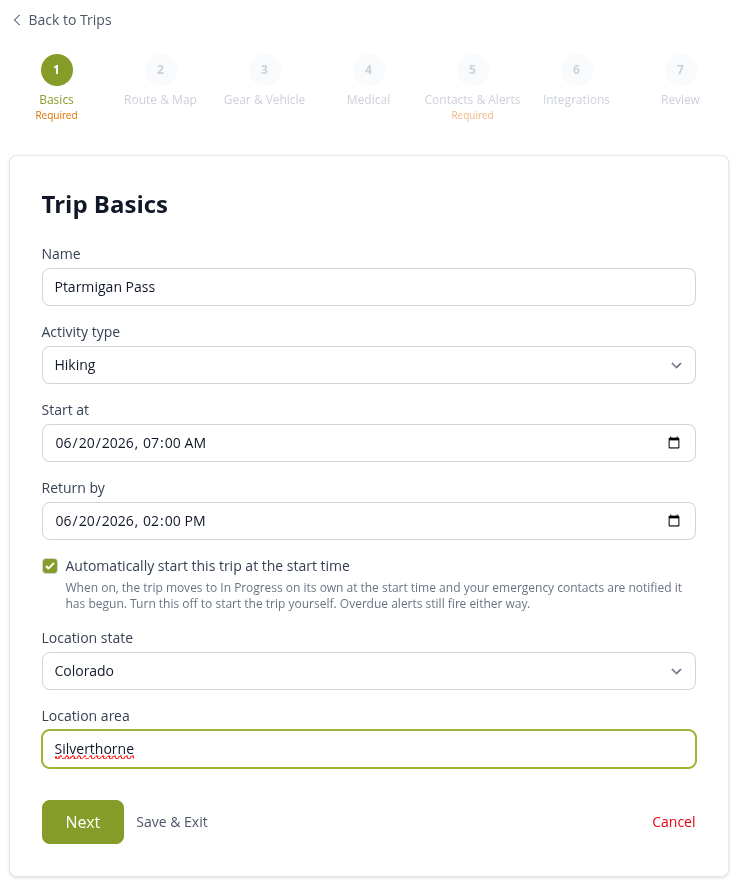
Step 1 — The Basics
Name the trip, where you'll be, when you're going, and confirm the time zone so every deadline lands in local time. You can also set the trip to start automatically at your departure time, so you don't have to remember to flip a switch at the trailhead. This step takes about a minute.
Step 2 — Route and Map
Upload the route you already built somewhere else. A GPX, KML, or KMZ file from your mapping app of choice drops straight onto an interactive map, and from there you can pin the things that matter to a searcher: where you're starting, where you intend to end up, where you plan to sleep, and where you're leaving the vehicle.
This step is optional, but it's also the single most useful thing you can do for a searcher. A planned route turns "somewhere in this mountain range" into "this drainage, between these two points." We don't publish anyone's coordinates or campsites. Your route lives in your portfolio and goes only to the people you choose. It's your trip, shared on your terms.
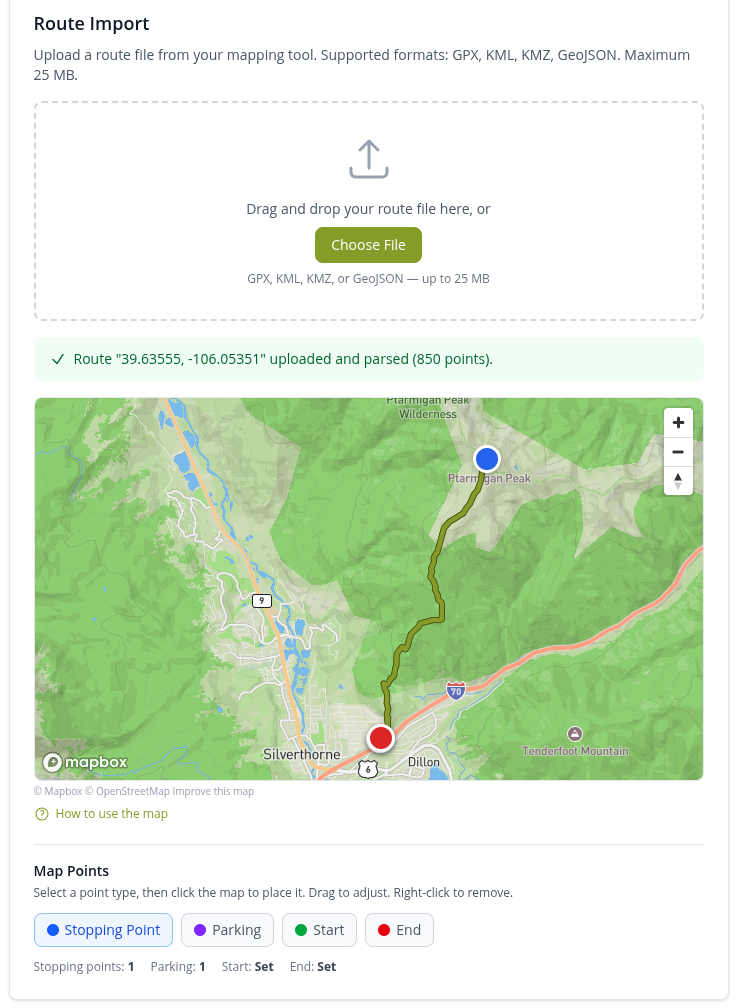 Drop in the route you already made. Pin the trailhead, your camp, and where you parked.
Step 3 — Gear and Vehicle
Add the vehicle you're leaving at the trailhead (plate, year, make, model, color, a photo) and the gear you're carrying. This isn't busywork. One of the first things a search does is look for the car at the trailhead, so the plate and a photo can confirm you're out there before anyone sets foot on the trail. Gear works the same way: the make, model, and color of your tent or pack helps a team confirm a sighting, and a photo of your boot tread is genuinely used to pick your prints out of a muddy junction.
Both your vehicle and your gear save to your account, so next trip you just pick them from a list instead of adding them again.
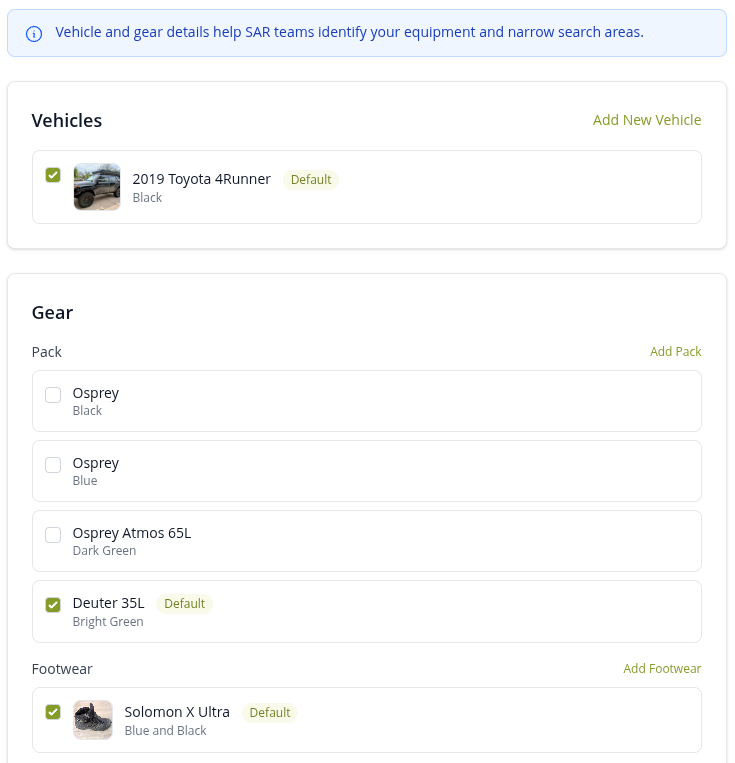 The car at the trailhead and the tread on your boots are both things a search team actually looks for.
Step 4 — Medical
Note your allergies, conditions, medications, and blood type, plus anything trip-specific worth flagging. Even entering "no known allergies" is useful. It tells a responder they don't have to guess.
Two things to know about this section. First, it's saved to your account and carried into every future trip, so you fill it out once. Second, we take great measures to ensure it is kept private: medical details are encrypted and reserved for first responders in an actual emergency. They do not appear on the link your friends and family see. The person watching from home learns that you're overdue and what to do about it. They do not get to read your medical history.
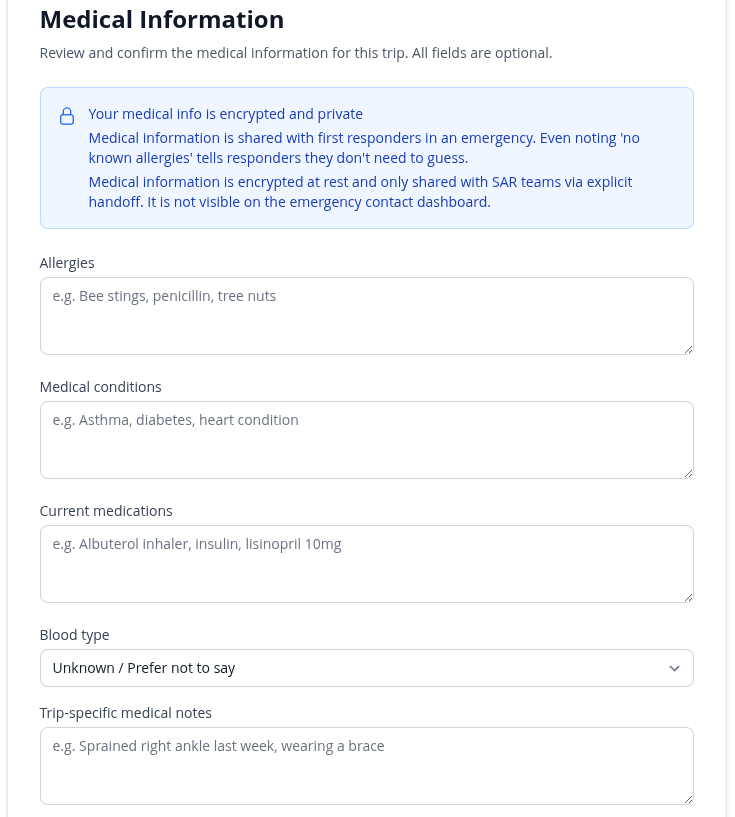 Allergies and medical history can be incredibly important to first responders in an emergency. We ensure that any of this data is encrypted and protected to keep you and your information safe.
Step 5 — Contacts and Alerts
This is the heart of it, and one step you can't skip. Choose the people who should be watching this trip. Each one gets their own private link by email. No account, no app, nothing to install on their end. You also set how long after your expected return the system should wait before it alerts them, which gives you a little grace for a slow descent without leaving anyone guessing for hours.
When that window passes without you marking yourself home, the portfolio emails your contacts automatically and points them at their link. They don't have to be watching the clock. The portfolio watches it for them.
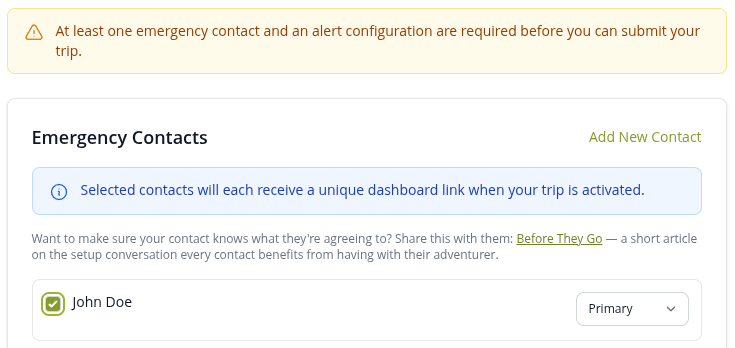 Pick who's watching. Each person gets their own private link. No account required.
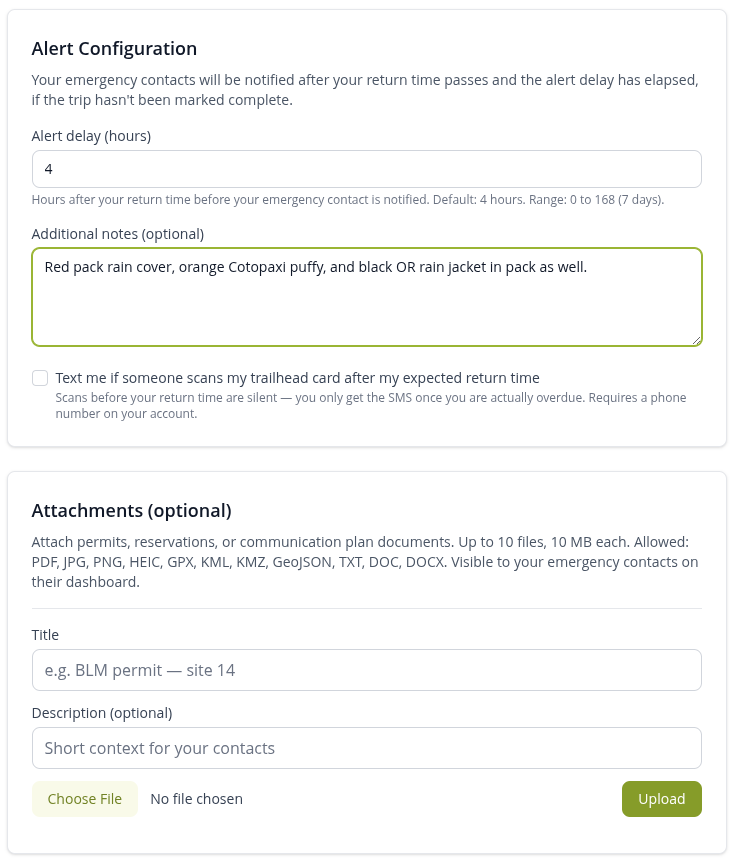 Set up notification alert settings and timing to emergency contacts.
Step 6 — Integrations
If you carry a satellite communicator, this is where the portfolio stops being a static plan and starts moving. Connect a Garmin inReach or a SPOT, and as your device reports its position, those points appear on the map your contacts are watching, each one stamped with how long ago it came in and, when available, your device's battery level. The person at home sees where you actually are, not just where you intended to go.
Garmin inReach and SPOT both work today. Support for Zoleo and for APRS over amateur radio is on the way; we'll announce those in the newsletter as they land. None of it is required (a portfolio with no device connected still does its core job), but if you already carry a communicator, this is how you put it to work for the people at home.
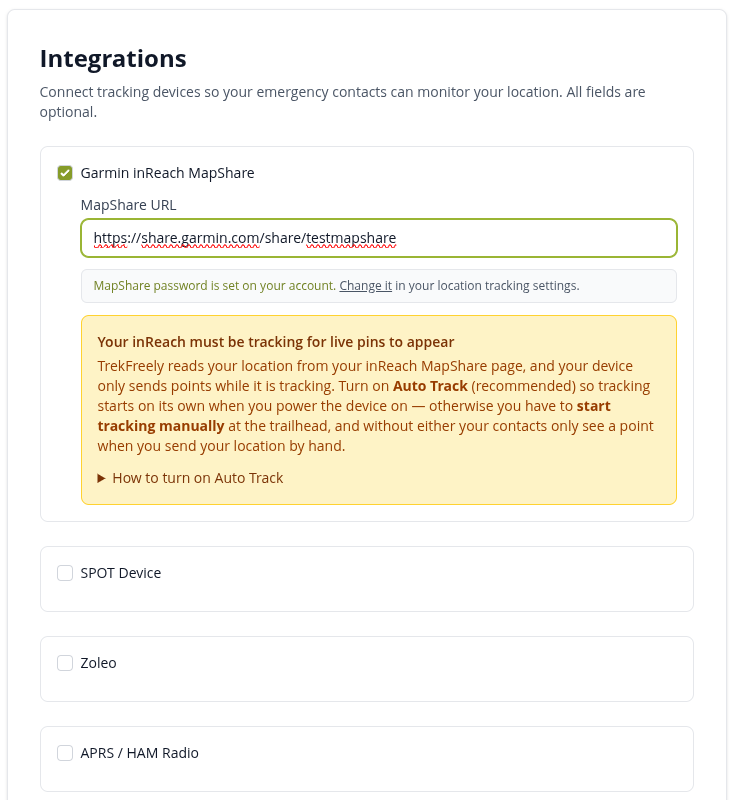 Connect an inReach or SPOT and your real position shows up on their map, not just your plan.
Step 7 — Review and Go
The last step lays the whole portfolio out in one view so you can check it before it goes live. When it looks right, you activate the trip. From that point your contacts' links are live, the overdue clock is set, and any device you connected starts feeding the map.
After a trip, you can mark it complete when you're home, and you can duplicate a finished trip into a fresh draft, handy when you run the same routes or head out with the same crew, since most of the work is already done.
One more thing: the trailhead card
Before you leave, you can generate a printable trailhead card for the trip and leave it on your dashboard or in the glove box. It carries a code that a stranger (a ranger, another hiker, a tow driver eyeing an abandoned car) can use to reach a stripped-down page with just enough to help: the trip name, when you were due back, and the number for the county sheriff who'd run a search there. It shows none of your personal details. It exists for the exact situation where the person who finds the first clue isn't someone you know.
Their side: what the people at home see
All of that work pays off by giving your emergency contacts one clear place to look. The people you chose get an email with their own private address for your trip. They tap it and land on a page built for someone who may have zero outdoor experience and a lot of worry. No login, no app, no setup.
At the top is the one thing they actually want to know: your status. On time, overdue, or wrapped up. Below that, the picture fills in: your trip plan, your route on a map, and if you connected a device, your last known position with a note on how fresh it is. They can see your vehicle, the gear you're carrying, the other people watching the same trip, and a running record of your latest updates. Everything you put into the portfolio, they can see here, laid out plainly. The more you entered, the more they have.
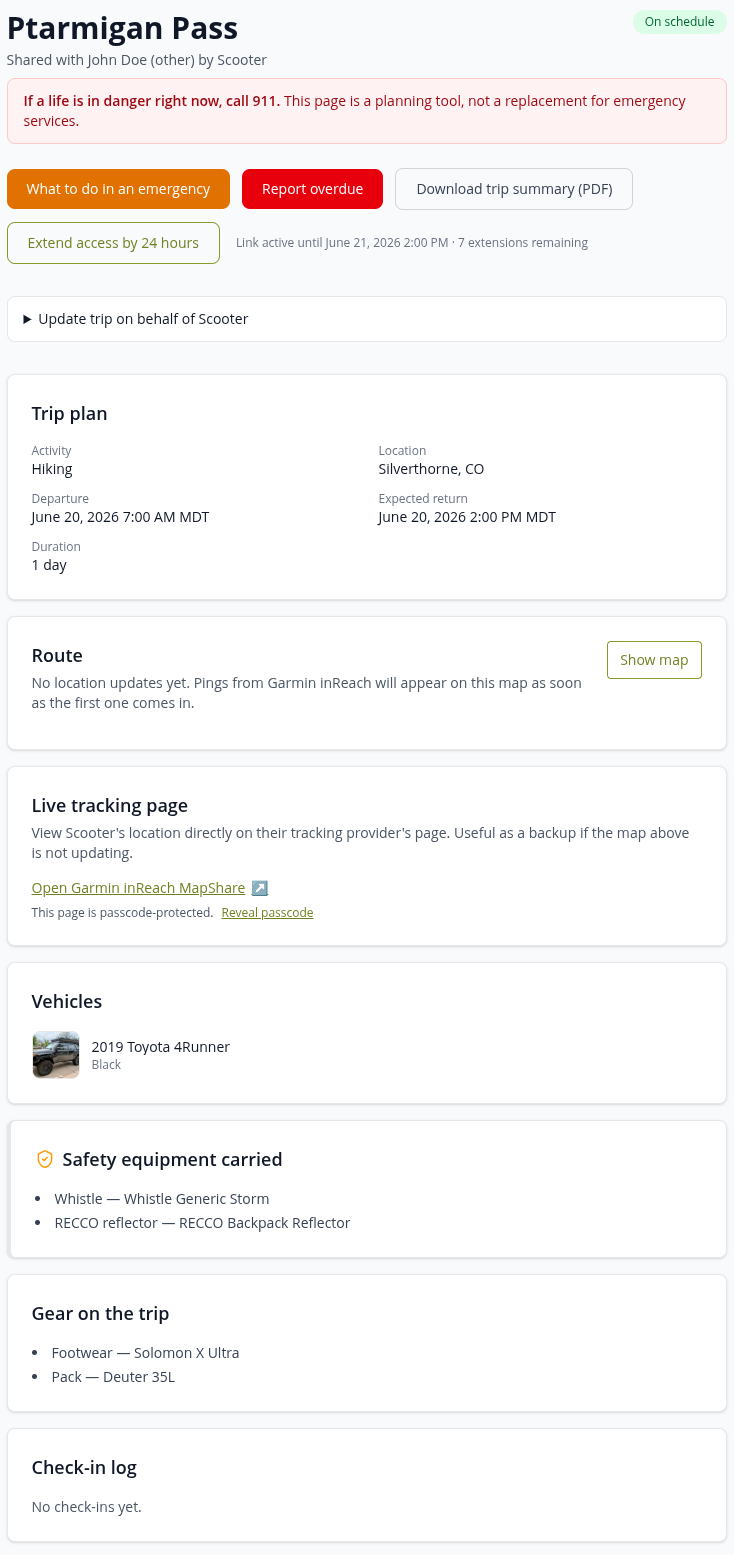 What the link opens to. Status first, then the whole trip, no account, no app.
The part we're proudest of only shows itself when something's wrong. If you go overdue, the page doesn't just turn red and leave your contact to figure it out. It opens an emergency action plan: a calm, step-by-step walkthrough of what to do, written for someone who has never done this before. It tells them when to wait and when to call, it carries the actual phone number for the county sheriff and ranger station with jurisdiction over your trip's location, and it warns them if the last position they're looking at is getting old. They can report you overdue, adjust your expected return time if plans changed, mark you safely home, and download a clean summary of the whole trip to read out to a dispatcher.
This is the difference between handing someone a map and handing them a plan. A person who has never called search and rescue in their life should not have to improvise that call while frightened. The portfolio does the part they can't be expected to know, so the only thing left to them is the part only they can do: noticing, and picking up the phone.
The person at home doesn't need to be an expert. They need to know they're not on their own.
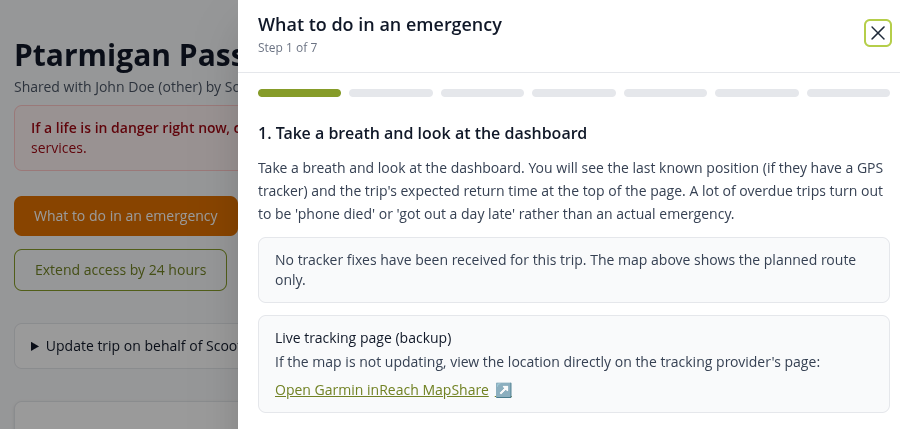
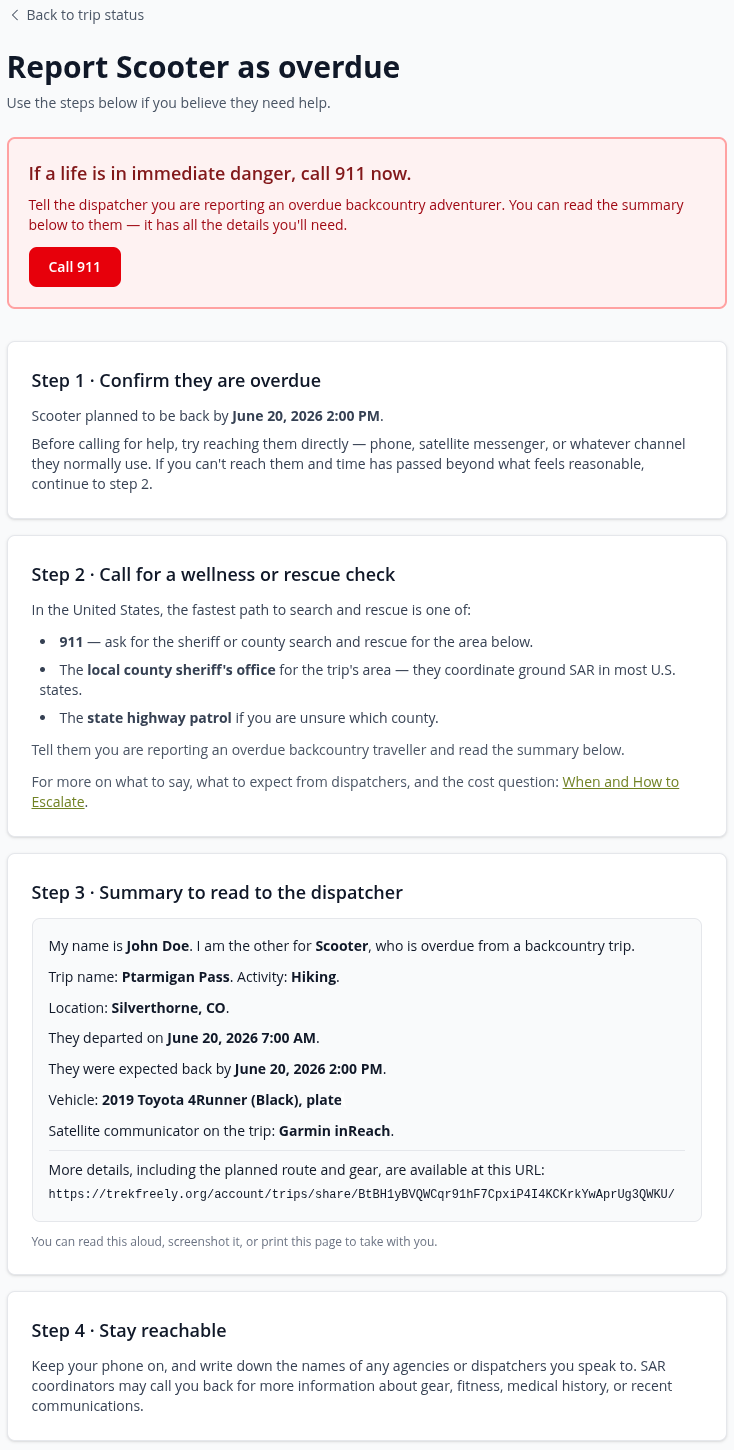 If you go overdue, the page walks them through it, including who to call for the area you're actually in.
It's free, and it's staying that way
Everything outlined in this post is free. Not free-for-now, not free-until-you-hit-a-limit, not free-if-you-don't-mind-ads. Free, on purpose, permanently. There is no paid tier coming, no premium dashboard, no selling the data you trust us with. Safety tools stop being safety tools the moment they depend on what you can afford, and the whole reason TrekFreely is a nonprofit is to make that a structural promise instead of a marketing line. We don't ask anything in return for using it. It's already free. You're just keeping it that way for the next person.
There's more on the way. Live tracking with inReach and SPOT works today; Zoleo, APRS, text-message alerts, and a mobile app are all in the pipeline. Rather than list a roadmap here that'll be out of date by next season, we announce features in our monthly newsletter as they are released, so if you want to know when something becomes available, make sure you're subscribed.
We'll also be following this post with two short video walkthroughs on our YouTube channel: one for building a portfolio, one for the people at home receiving the link. If you'd rather watch than read, keep an eye out for those.
If you've read this far, you only have one more thing to do and it's an easy one: build your first one before your next trip.
- Create a free account and put together your first portfolio.
- Learn more about the trip portfolio if you want the overview before you sign up.
- Sign up for the newsletter to hear when new features and integrations go live.
- Share TrekFreely with friends and family who spend time in the backcountry too.
You do the part only you can do. Go out prepared, come back safe. We'll make sure the people at home are never left guessing.
Begin Your Adventure
References
The figures and guidance in this post come from these public sources:
- Colorado search-and-rescue figures: Colorado Parks and Wildlife study, reported by Backpacker, "Colorado's Search and Rescue Teams Are Overworked and Underfunded. A New Law Aims to Fix That" (2024). https://www.backpacker.com/news-and-events/news/colorado-search-and-rescue-funding-law-2023/
- National Park Service incident totals and outcomes: Heggie TW and Heggie TM, "Dead Men Walking: Search and Rescue in US National Parks," Wilderness and Environmental Medicine (2009). https://pubmed.ncbi.nlm.nih.gov/19737043/
- How quickly lost people are found: Outside Online, "How Backcountry Search and Rescue Works." https://www.outsideonline.com/outdoor-adventure/exploration-survival/how-backcountry-search-and-rescue-works/
- Search-area math and the value of a trip plan: AdventureSmart (Search and Rescue Volunteer Association of Canada), "Trip Plan" and "The Three Ts." https://www.adventuresmart.ca/trip-plan/
- Leaving an itinerary with a trusted contact: U.S. National Park Service, "Trip Planning Guide" and "Hike Smart." https://www.nps.gov/subjects/healthandsafety/trip-planning-guide.htm
- Leave your itinerary and check in on return: U.S. Forest Service, "Hiking: Know Before You Go." https://www.fs.usda.gov/visit/know-before-you-go/hiking